CariDotMy
Title: satelit tv [Print this page]
Author: plamsat Time: 25-8-2006 07:56 AM
Title: satelit tv
satelit tv
Author: St.Yeepi Time: 26-8-2006 12:31 AM
mana forum yg bincang specific pasal satellite dish dalam bahasa melayu
Author: plamsat Time: 14-9-2006 01:41 PM
Originally posted by St.Yeepi at 26-8-2006 12:31 AM
mana forum yg bincang specific pasal satellite dish dalam bahasa melayu
http://www.takeforum.com/mydish kat sini ada forum satelit tv dalam bahasa malaysia
Author: plamsat Time: 26-11-2006 10:40 PM
http://www.freewebs.com/plamsat/
Author: azmi_hisham Time: 13-3-2009 10:40 PM
Title: Mari kita hidupkan balik thread nih...
Aku ada pasang satelit dish + STB Topfield 5000CIP (motorized).
Dual LNB (C band dan Ku band).
Masalahny sekarang ialah aku tak dapat signal Ku band. C band no problemo...
Salah kat mana ye... setting LNB kat dish ke??
Sesapa expert tolong jawab...
Author: azmi_hisham Time: 20-3-2009 04:47 PM
Tak pasti lak.. tapi kan bila nak install kat ring tu ada focal point nya kan.. brapa value perlu utk KU band?
Author: ranjer Time: 22-3-2009 06:23 PM
bila baca topik nie teringat group "curi ayam" dulu. Ada x member kat sini ke?
Author: Magge Time: 20-4-2009 01:39 PM
TUMPANG LALU, AKU PUN BERMINAT NI....
TQ
Author: Dunhill. Time: 22-4-2009 01:32 AM
aku nak sambar TrueTV punya dekoder dgn kad seumur hidup kalo murah 
Author: logy Time: 22-4-2009 03:01 PM
boleh tgk chanel aper guner tv nie?
nie tentu bukan citer tentang astro kang?

Author: geng_tx Time: 17-6-2009 09:05 AM
Originally posted by bencham at 10-6-2009 00:16 
 TrueTV full channel hanya $50 sebulan sahaja...1set tvro system ialah: 1 receiver ,60cm dish, pasangan baru pecuma 6 bulan channel tgk......hanya anda rumah ada internet line....
ini ...
50 apa tu boss? USD, SD?
bayar kat mana?
Author: man_blues87 Time: 18-8-2009 04:20 PM
ade lagi ke bende nie???
Author: saniboy79 Time: 31-10-2009 03:14 PM
aku pun berminat ni, nak contact sapa ye?
Author: marwang Time: 31-10-2009 08:30 PM
korang....
kat mana nak beli satellite dish nih???? yg murah n quality
puas cari ....xjumpe laaa
btw mcm mane nak setup ek???
Author: marwang Time: 31-10-2009 08:32 PM
kalo beli receiver + satellite dish nih....dr ebay.....camne nak tau bleh pakai kat msia ke x ek???
aku sgt2 interested nak beli!!!
Author: Sniper2 Time: 15-4-2010 10:41 AM


Author: Sniper2 Time: 15-4-2010 10:46 AM


Author: Sniper2 Time: 15-4-2010 10:49 AM
http://www.forwardsat.com/index. ... 32049&Ntype=777
Author: Sniper2 Time: 15-4-2010 10:50 AM

Author: Sniper2 Time: 15-4-2010 10:54 AM

Author: Sniper2 Time: 15-4-2010 10:55 AM
Asiasat2
Asiasat2
Author: Sniper2 Time: 15-4-2010 10:56 AM
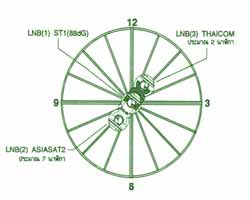
เทคนิคการติดตั้งจาน 5.5 ฟุต DUO THAICOM 2/3 & NSS 6เทคนิคการติดตั้งจาน 5.5 ฟุต DUO THAICOM 2/3 & NSS 6
THAICOM 2/3 C/KU & NSS 6 Ku

ขั้นตอนที่ 1 การติดตั้งจานแบบ Fix. รับดาวเทียม THAICOM 2/3

1. ตั้งเสาตั้งจานให้ได้ 90 องศา หรือให้ตั้งฉากกับพื้นโลกให้ดีที่สุด
2. ประกอบหน้าจานกับเสาตั้งจาน
3. ประกอบ LNB เข้ากับหน้าจาน ปรับ LNB ให้ได้ตามรูปหรือไกล้เคียง
4. ใช้เข็มทิศ แบบก้านอลูมิเนียม วัดทิศดาวเทียมไทยคม 240 องศา
- ตั้งเข็มทิศให้ตัวเลข 240 ทับกับเส้นสีแดง
- นำฉากอลูมิเนียมที่ติดเข็มทิศไปวางทาบที่คอจาน เหมือนภาพตัวอย่าง
- ปรับหน้าจานให้ เข็มทิศสีแดงดำ หมุนตรงกับทิศเหนือใต้ดังภาพ
5. ปรับมุมก้มเงยหาสัญญาณและปรับสัญญาณให้ได้แรงที่สุด ล๊อคน็อตทุกตัวให้แน่น
ขั้นตอนที่ 2 การทำ DUO THAICOM 2/3 & NNS 6
1. ประกอบ LNB Ku-Band Extra-Gain เข้ากับแขน DUO ตามรูป
2. ต่อสายตรงเข้าเครื่อง และลองเฉพาะดาวเทียม NSS 6 ก่อน
ตั้งค่า LNB เป็น Universal
3. ประกอบชุด DUO เข้ากับ LNB C-Band ตามรูป ปรับหาสัญญาณให้ได้
สัญญาณสูงที่สุด ล็อคน็อตให้แน่น เป็นอันว่าจบขั้นตอนการติดตั้งจาน DUO
4. ประกอบชุดสวิทตัดต่อสัญญาณ เข้ากับจาน แล้วปรับเครื่องให้ ระบบเครื่องเลือกดาวเทียมที่ต้องการให้ถูกต้องตามสวิทตัดต่อ ที่ต่อเอาไว้ เป็นอันว่าจบทุกขั้นตอนครับ


ในรูปนี้ ใช้ LNBF เป็นแบบ CKU
จะทำให้รับสัญญาณได้เพิ่มขึ้นอีก ทดสอบแล้วสัญญาณแรงมากครับ
นำเสนอโดย WWW.SIAMSATELLITE.COM
Author: Sniper2 Time: 15-4-2010 10:59 AM
Post Last Edit by Sniper2 at 15-4-2010 11:01
เรื่อง การติดตั้งจานชุด Dmove [table=,#ffffff][tr=#eeeeee][td][size=-7]หน้า2 
[/td][/tr][tr=#eeeeee][td][size=-7]หน้า 3 
[/td][/tr][tr=#eeeeee][td][size=-7]หน้า 4 
[/td][/tr][tr=#eeeeee][td][size=-7]หน้า 5 
[/td][/tr][tr=#eeeeee][td][size=-7]หน้า 1 
[/td][/tr][tr=#eeeeee][td][size=-7]หน้า 6 
[/td][/tr][tr=#eeeeee][td][size=-7]หน้า 7 
[/td][/tr][tr=#eeeeee][td][size=-7]หน้า 8 
[/td][/tr][tr=#eeeeee][td][size=-7]หน้า 9 
[/td][/tr][tr=#eeeeee][td][size=-7]หน้า 10 
[/td][/tr][tr=#eeeeee][td][size=-7]หน้า 11 
[/td][/tr][tr=#eeeeee][td][size=-7]หน้า 12 
[/td][/tr][tr=#eeeeee][td][size=-7]หน้า 13 
[/td][/tr][tr=#eeeeee][td][size=-7]หน้า 14 
[/td][/tr][tr=#eeeeee][td][size=-7]หน้า 15 
[/td][/tr][tr=#eeeeee][td][size=-7]หน้า 16 
[/td][/tr][tr=#eeeeee][td][size=-7]หน้า 17 
[/td
Author: Sniper2 Time: 15-4-2010 11:04 AM
การติดตั้ง LNBF EXTRA GAINการติดตั้ง LNBF EXTRA GAIN
เพื่อรับ DREAM TV สำหรับจานแบบ FIX.
1) ติดตั้ง LNBF EXTRA GAIN กับเพลท KU โดยให้ตัวประกบ ยึดอยู่ด้านล่าง
2) ปรับมุมolarizeโดยหันขั้ว F-Type ของLNBFไปที่ตำแหน่ง 8 นาฬิกา ตามรูป
3) ปรับระยะโฟกัส โดยให้ตัวประกบ ยึดอยู่ที่กึงกลางคอของ LNBF
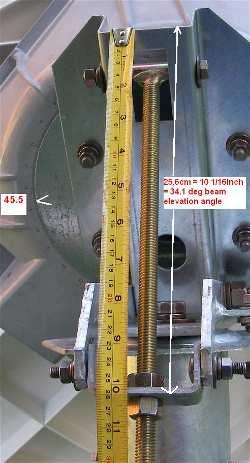
4) ปรับหน้าจานก้มลงมาที่มุม 54.1 องศา ( เป็นค่ามุมที่กรุงเทพฯ )
5) ส่ายหน้าจานดาวเทียม ไปที่ประมาณ 103 องศา ( ทางทิศตะวันออก )
6) ค่อยๆ ส่ายหน้าจาน ทีละนิดอย่างช้าๆ จนเริ่มรับสัญญาณได้
7) ปรับมุมก้มเงยทีละนิด จนรับสัญญาณได้แรงที่สุด
จากนั้นล็อกสกรู ที่คอจานให้แน่น


Author: Sniper2 Time: 15-4-2010 11:52 AM
Introduction (now at Techtir Articles Satellite: How to align a dish )

Since all satellites for DTH (Direct To Home) TV are in geosationary orbit, they are positioned on an imaginary arc (now called the Clarke Belt in honour of Arthur C. Clarke) about 22,500 miles above the equator. This means a satellite dish always points upwards and in the direction of the equator i.e. generally southwards.
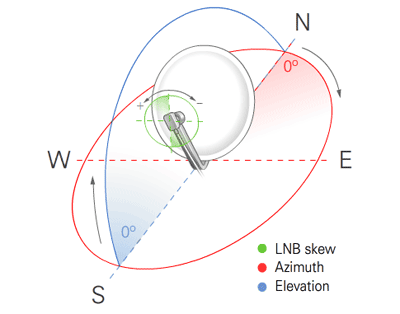
Terminology : Elevation and Azimuth The up and down angle is called 'Elevation'.

The East and West rotation angle is called 'Azimuth'.
Offset dishes : A word of warning An offset dish may appear to point downwards!

Offset dishes may appear to be pointed low towards the horizon, when in fact they are aiming at a much high elevation as shown in the above diagram.
Getting started If you've never aligned a dish before, it can be very frustrating, especially if you don't have a signal meter of some sort. You may well end up thinking the receiver is faulty. Digital channels are either 'on' or 'off' and do not fade in or out gradually like analogue signals, further adding to the difficulty. Waving a dish about in the deluded hope that you will somehow find the correct location without either setting the elevation angle or knowing the azimuth angle is a complete and utter waste of time. However, if you follow the steps outlined below you will succeed ... eventually!
1. Attach the F-connectors - Make sure that the cable and F-connectors are properly fitted as described clearly in the link. The inner core of the coax cable and the outer braid must never come in contact with each other.
2. Set the elevation angle - For the majority of novice satellite users, the satellite they wish to align to is the Astra2/Eurobird cluster at 28 degrees east. This is where Sky, BBC, ITV and C4 are transmitted from. For Ireland, the dish elevation for Astra2 is approximately 22 degrees.
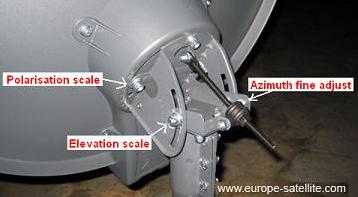
Most offset dishes have an elevation scale on the mounting bracket which allows you to adjust the dish to the correct elevation.

Set this to 22 degrees and then tighten the nut.
For satellites other than Astra2, a list of approximate elevation angles is provided.
3. Tune your receiver - If you don't have a signal meter, you will have to use your receiver's on-screen meter. Firstly, make sure you are tuned to an active channel or transponder and that all the parameters are correct - Frequency 10.774GHz, Symbol Rate 22000, Polarisation Horizontal, (FEC Auto or 5/6) is suitable for the BBC channels on Astra2.
You may have to enter the Setup/Installation menu in order to have a constant display of the meter.

Note that the Signal Quality level is the important guide, not Signal Strength level!
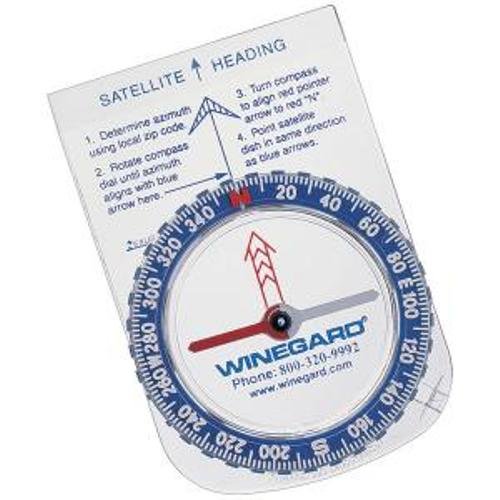
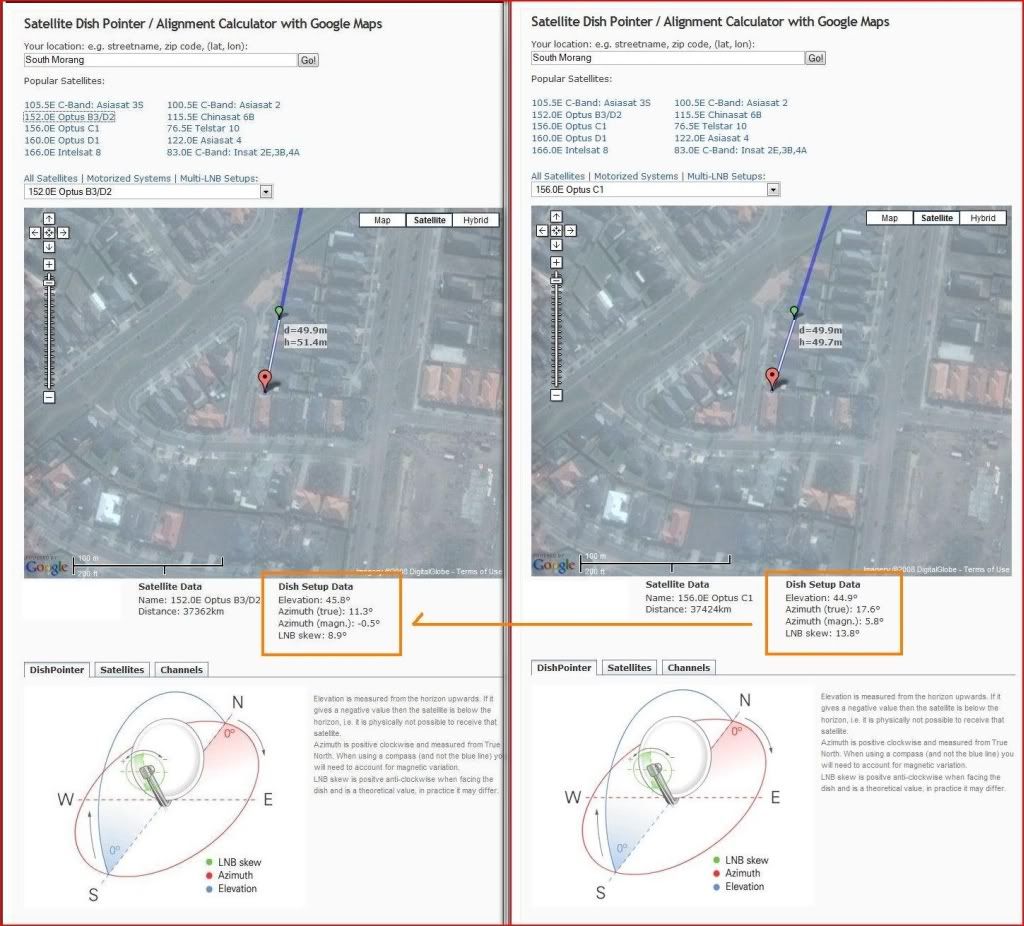
4. Aim the dish - A compass can be used to get a rough idea of where to aim the dish but remember to keep the compass away from the metal dish. The Dishpointer tool below is especially helpful.
<iframe name="dplite" frameborder="0" width="300" height="415" scrolling="no" src="http://www.dishpointer.com/servlet/dplite.php?showmap=true&showsatlist=true&showinfo=true&bgcol=FFFFFF&width=300&height=300&defaddress=Phoenix%20Park%2C%20Dublin&txtsize=10&txtcol=000000&language=en&satellite=0282"></iframe>
Alternatively you can use a calculated sunpass time for the satellite i.e. the time at which the sun's azimuth is the same as the satellite. A detailed explanation on how to locate a satellite using the position of the sun is provided.
5. Rotate the dish - Slowly move the dish east or west incrementally until you observe some activity on the receiver meter settings. If you rotate the dish too quickly, you will run past the satellite as there is a usually a small lag before the receiver quality meter reacts. When you do see activity on the meter, rotate the dish about that point until the level is at a maximum. Lock the dish into place.
6. Optimise the elevation - With the dish pointing in the right direction, readjust the elevation as per 2 until the quality is at a maximum
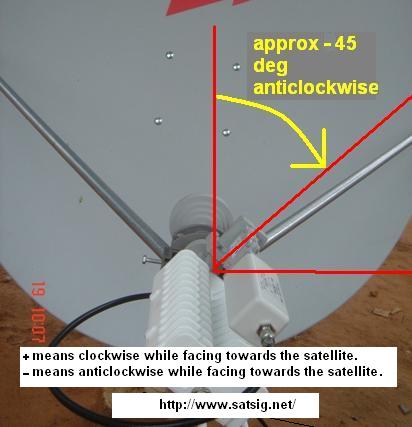
7. Set the skew angle - As you face the dish, rotate or twist the LNB clockwise for an easterly satellite or anticlockwise for a westerly satellite until the quality is again maximised. This can make a very significant improvement to the signal quality and should not be overlooked!

8. QED - Finished! If some channels are missing, then do a channel search to update the receiver's database.
Common Issues
1. When I perform a channel scan, I can only find German/Italian/foreign channels - if you find that mostly German or Italian channels are returned when you do a scan, then you are probably aligned to the wrong satellite. This will most likely be Astra 1 at 19 degrees east (or occasionally Hotbird at 13 degrees east). Therefore, the dish is aligned to a satellite which is both west of, and higher than, your target satellite at 28 degrees east. Note the current position of the dish using a marker or tipex, lower the dish by about 3 degrees and move it slowly east until you see activity again on the meter.
2. The signal meter is registering 80%, but all of the preprogrammed channels are still blank - again you are most likely aligned to the wrong satellite. The same frequencies are reused on different satellites across the arc e.g. on Astra 2D 28E, BBC One is transmitted on 10.818, V, 22000. But on Astra 1KR 19E, TVVI is also transmitted on 10.818, V, 22000. So if your receiver is tuned to BBC One, but your dish is aligned to Astra 1KR 19E, the signal level and quality meters will show readings of 80%, but the screen will remain blank. The solution is to align the dish to the correct satellite as per 1.
Additional Information
How to align a dish with a digibox.
Elevation calculations can be made online. (More technical calculation page )
Download the free dish calculator from Swedish Microwave AB.
For the more experienced user, Gorbtrack provides a wealth of information, including Sun-pass times and realtime tracking of inclined orbits.
Orbitron for tracking other man made objects, such as ISS, Iridium satellites.
Author: Sniper2 Time: 15-4-2010 11:55 AM
Post Last Edit by Sniper2 at 15-4-2010 12:08
[url=[/url]
[table=98%][tr][td=1,1,160]Your Location[/td][td=1,1,190]Satellite Data[/td][td=1,1,180]Dish Setup Data[/td][td=1,1,100][/td][/tr][tr][td]Latitude: 3.1770°
Longitude: 101.6816°
[/td][td]Name: 78.5E Thaicom 2, 5
Distance: 36403km
[/td][td]Motor Latitude: 3.2°
Declination Angle: 0.6°
Dish Elevation:
°
Elevation: 62.6°
Azimuth (true): 262.6°
Azimuth (magn.): 262.9°
LNB Skew [?]: 82.0°


Dish Skew [?]: 90.0°
Author: Sniper2 Time: 15-4-2010 12:04 PM
Post Last Edit by Sniper2 at 15-4-2010 12:06


Author: Sniper2 Time: 15-4-2010 12:26 PM


Author: Sniper2 Time: 15-4-2010 12:40 PM
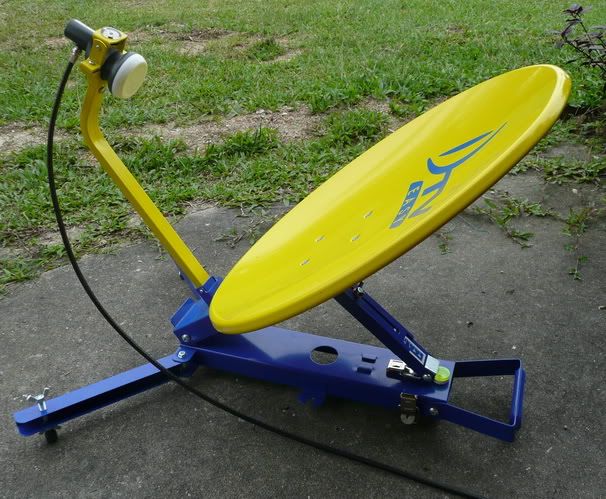
| Your KI KONECT - K2 PORTABLE DISH |
|
| | 
[table=98%] | | KI KONECT - K2 PORTABLE DISH |
| Congratulations, you have joined thousands of people who enjoy Satellite TV and want to experience the fun and freedom of using the satellite TV anywhrer they go.
The KI KONNECT-K2 Portable Dish package has been developed from years of trial and refinement. We believe it will give you many hours of joy and satisfaction.
However, as with packages of this nature, improvements are always possivle and it will help us and other people like you, if you can feedback your idea and suggistions so we can continue to improve and make the portable dish package to more for you. Before we start experiencing the fun of portable Satellite TV, lets take some time to learn more about the package.
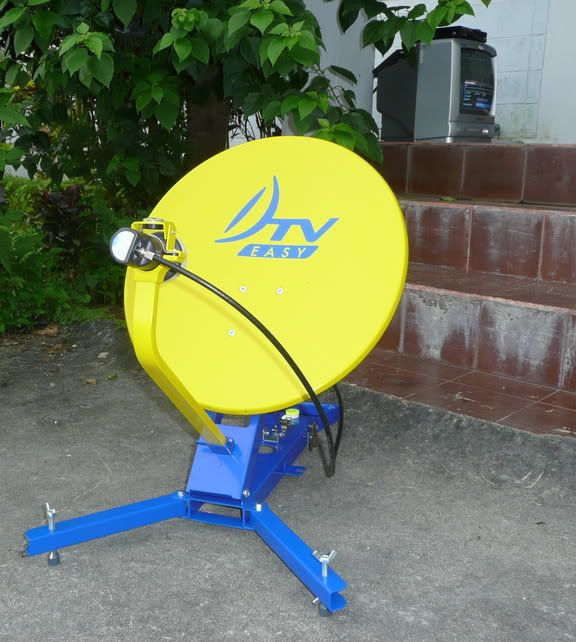
KI KONNECT -K2 COMPACT SET
The package come complete with the dish panel, the LNBF, a carrying bag, and the signal cables. You only have to bring along the IRD and do not forget the remote control of your IRD because you will need it to access functions required for setting up the dish antenna.
|
|
 |
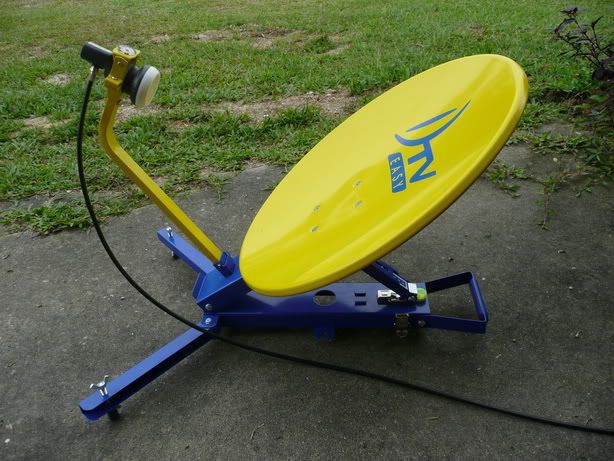
The Portable Dish is a folding package allowing it to be very compact in the folded position. It also enables the user to carrying the folded package around using the carrying handle (1).
Once the package has been unfolded into the operation configuration (above in Fig. 2), it can be set on any flat surface. The Portable Dish stands on three support points, two (adjustable) support points are part of the Adjustable Stands (4) in fornt and one fixed at the back below the Azimuth Locking Knob. With this support configuration, the package can be adjusted to provide a level operating platform on virtually any surface. In order to point the dish at Thaicom satellite, the Portable Dish employs adjustments for azimuth and evelation as well as a compass to aid in locating the proper satellite. An experienced user can usually set up the dish within 10 minutes. | | [table=98%] |  | | Fig 1 Component of the Portable Dish |
|
|
[/td][/tr][tr][td=2,1][/td][/tr][tr][td=2,1]Installation of the KI KONNECT -K2 Portable Satellite Dish[/td][/tr][tr][td=2,1][/td][/tr][tr][td=2,1] |
This section describes the steps to be taken when setting up the Portable Dish to receive Thaicom 2,3 satellite signal,
If you are in a hurry and want to quickly set it up to enjoy the TV program, then read section "How to set up the Portable Dish quickly" which describes the quick setup steps. If you have a little more time and want to understand the details of setting up the Portable Dish then read section "Detailed Discussion on How to Point the Dish at Thaicom 2&3 Satelites". |
|
| How to set up the Portable Dish quickly |
| It is very easy to set up the Portable Dish so that you can receive the TV programs Just follow the following 1,2,3 steps. |
1. Setup the dish on a Level Ground
|
| Unfold the front stands by unlatching the left and right latches be careful to support the dish reflector to prevent it from dropping forward. FIG 1,2 The two front stands can be unfolded and extended to the appropriate position depending on the actual terrain. | [/tble]| [table] |  | | FIG.1 UNFOLD THE LEFT (SHOWN) AND RIGHT LATCHES |
|  | | FIG.2 EXTEND THE STANDS TO AN APPROPRIATE POSITION |
|
|
 |
FIG.3Y WHEN FOLDING THE LEGS AFTER USE, PLEASE MAKE SUTE THAT THE LEG
SEATS ITSELF INTO THE SEAT (A) CERTAIN PRESSURE MAYBE NECESSARY
TO ENSURE PROPER SEATING, ONCE STATED (B) IT IS QUIET EASY TO LATCH IT IN PLACE (C)
|
[/td][/tr][tr][td=2,1][/td][/tr][tr][td=2,1]| Unfold the dish reflector by lifting the back of the dish reflector. FIG. 3 |  | | FIG. 3 UNFOLD THE DISK REFLECTOR |
|
[/td][/tr][tr][td=2,1][/td][/tr][tr][td=2,1] | FIG.4 LIFT THE CATCH AND UNFOLD
THE ELEVATION ADJUSTMENT ARM |
| Unfold the elevation adjustment arm by unlocking the s
mall catch at the end of the elevation adjustment arm.
Swing the elevation adjustment arm out and
lock it in place by sliding the end through the slot and
latch in place. FIG.4 |
[/td][/tr][tr][td=2,1][/td][/tr][tr][td=2,1]| Retrieve the Feedboom (5) and the LNBF (3) and assemble them. FIG.5 |  | FIG.5 LOCK THE ELEVATION ADJUSTMENT
ARM IN PLACE WITH THE LATCH |
|
[/td][/tr][tr][td=2,1][/td][/tr][tr][td=2,1] | | FIG.6 ATTACT THE LNBF ON TO THE FREEDBOOM WITH THE LATCH |
| Then attach the Feedboom/LNBF assembly to the Frame (6) and lock in place. FIG. 6 |
[/td][/tr][tr][td=2,1][/td][/tr][tr][td=2,1]Next, set the dish package on a level ground. The more level you can set, the better off you will be, becuse all the helpful markings were done in the factory on a level surface.
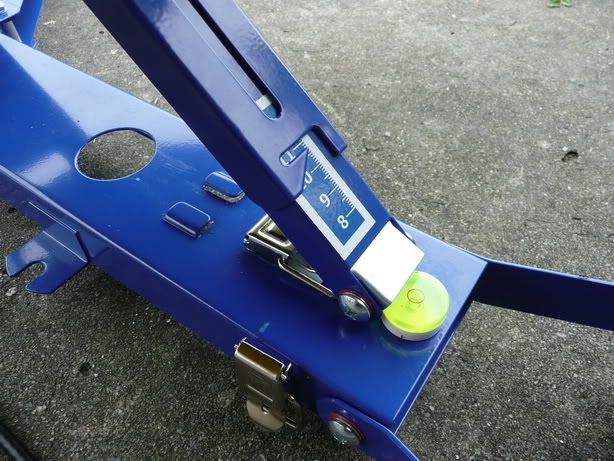
The dish package stands on three points, the single support point at the back is fixed, the front two legs employ adjustable support points and can be adjusted for proper height (4) until the spirit level (bubble) centers itself on the center of the level.
Normally the surfaces of the street, deck or lawn are adequately level.
If the space you have looks obviously like a slope then you should adjust the stands (4) so that the dish does not lean too much to the left or right. FIG. 7 |  | | FIG.7 ATTACH THE FREEDBOOM ON TO THE FRAME AND LOCK IT IN PLACE |
|
[/td][/tr][tr][td=2,1][/td][/tr][tr][td=2,1] | | FIG.8 THE SPITIT LEVEL HELPS TO MAINTAIN LEVEL |
| You should also avoid areas that has a lot of steel or magnetic fields such as setting the dish too close to objects such as an automobile, steel structure, steel reinforcement in the floor as it Interferes with the operation of the compass and makes it diffcult to locate the satellite FIG. 8 |
[/td][/tr][tr][td=2,1][/=2,1]2. Find out where we are[/td][/tr][tr][td=2,1] | | FIG. 9 SET STARTING ELEVATION ANGLE (SEE TABLE 1) |
| Look in table I and find the closest city to your current location. Table I will tell you what level to set the Portable Dish stand. Set the scale on the dish stand to the appropriate value. For example, if you are in Bangkok, you should set the pointer to point at "10" on the scale. |
[/td][/tr][tr][td=2,1][/td][/tr][tr][td=2,1]3. Find the Satellite[/td][/tr][tr][td=2,1]Swing the Portable Dish to the right or left until the North indicator on the compass (on top of the LNBF) points to the "N" marking on the floating scale of the compass (FIG 10)
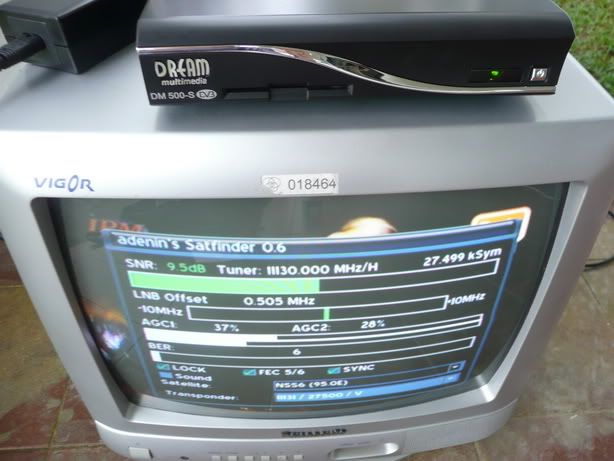
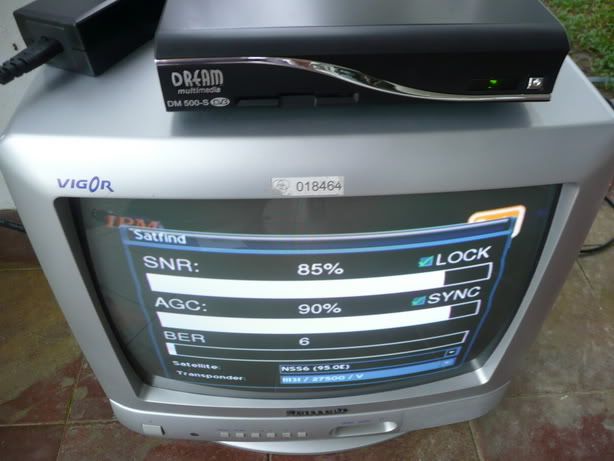
If you have not made any mistake, there should be a signal shown in the screen. Note the signal level on the screen, make fine adjustment (swing the dish slightly to the left then to the right) so that the signal level on the screen is at its maximum level.
Normally the signal level of over 180 is acceptable, however, we should be able to obtain 200-240 value easily, and 250 or above if you are really good!
| [table=98%] |
 |
| FIG. 10 FIND THE SATELLITE AZIMUTH ANGLE |
[/td][/tr][/tale][/td][/tr][tr][td=2,1][/td][/tr][tr][td=1,1,450][table=450][tr][td] [/td][/tr][tr][td]FIG. 11 PERFORM FINE ADJUSTMENTS AND SECURE THE SETTINGS[/td][/tr][/tabe][/td][/tr][/tabe][/td
Author: Sniper2 Time: 15-4-2010 12:41 PM
Dish Azimuth (deg E relative to true north) Prime Focus 1.2m and above |
|
Author: Sniper2 Time: 15-4-2010 12:54 PM
| re : Minta tolong...Nak tune 88° ST1... #20547 |
| | Author: lapanlapan | Posted:2009-05-05 19:53:04 |
|
|
 | kalau ikut cara kampun, dari belkang dish tu, dongak kan sikit 2 inci kot ...
gitu le ....tune smapai dapat signal yg ok.. 

|
|
|
|
| re : Minta tolong...Nak tune 88° ST1... #20548 |
| | Author: lapanlapan | Posted:2009-05-05 19:57:12 |
|
|
| | Dish elevation (deg) Prime Focus 1.2m and above = 16.62
Dish Azimuth (deg E relative to true north) Prime Focus 1.2m and above =
257.58
kan bende ni ada kat website ni... |
|
|
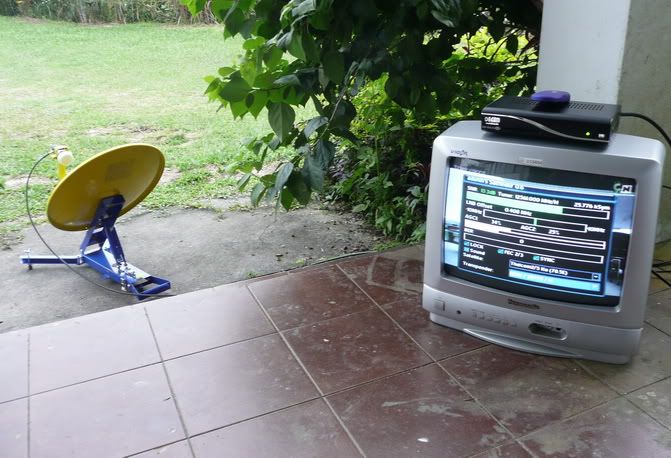
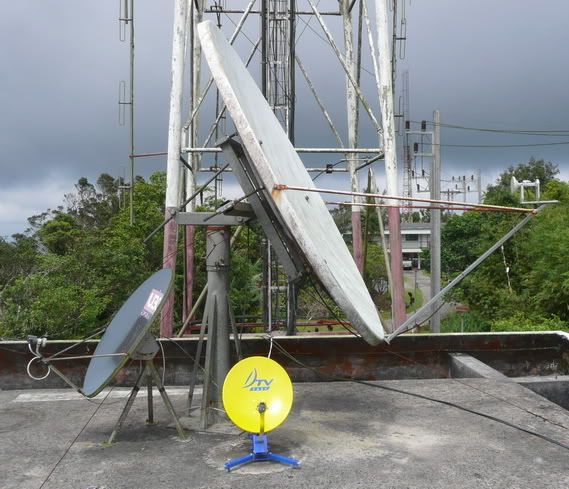
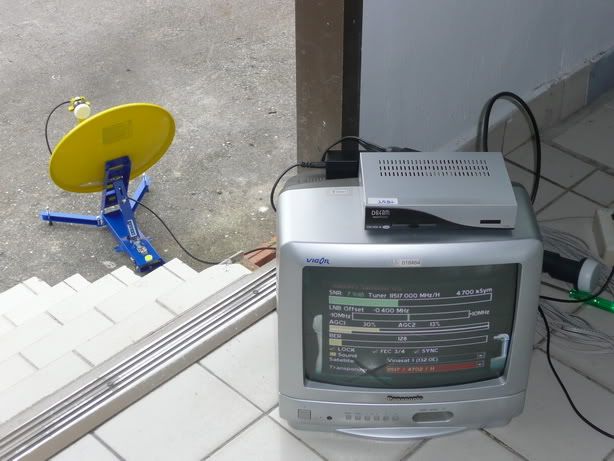
Those channel as shown in the picture are what we get are from SE beam with original assthrow dish + LnB(4'o clock)
NE beam cannot get in west Malaysia with this setup.
Khairul, no matter where u point your dish, you will always get the strength of 40-50%. This is due to the LnB noise floor amplification gain.
Normally if pointed to satellite, the strength should be more than 65%.
I think u need to find the correct dish position poiting to NSS6 and also turn your LnB to 4'o clock position.
Good Luck  )
)

Author: Sniper2 Time: 15-4-2010 01:10 PM
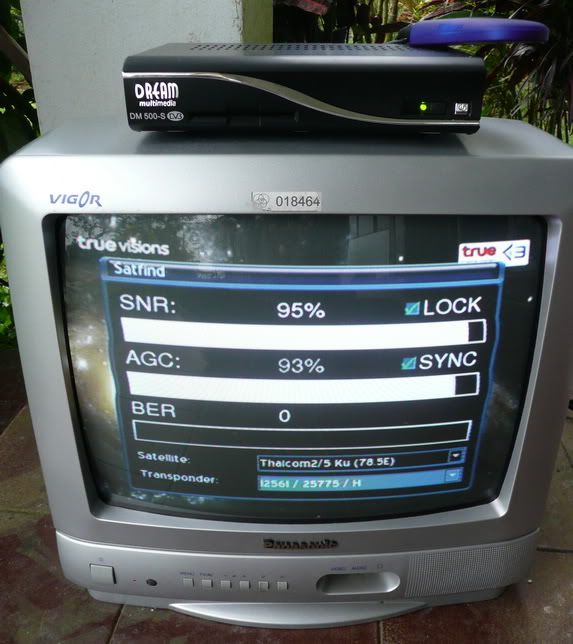
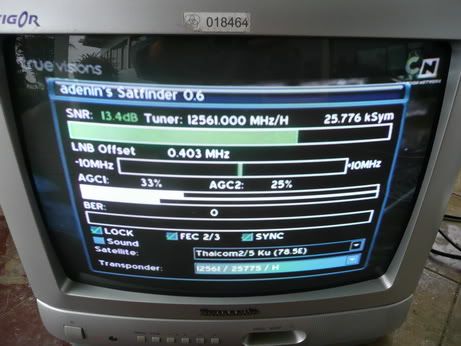
satSystem...kalau nak tune Thaicom5 Ku...LNB sama arah mcm As*** (tak payah ubah dah). Pastu dish turunkan hingga ukuran sudut antara 60-62 darjah. Pastu halakan dish ke kanan sikit dari kedudukan asal As***.
Kalau ada blind scan senanglah...kalau takde blind san masukkan :
12272/H/30000
12313/H/30000
12355/H/30000
12399/H/30000
Selebihnya transponder UBC. Yang saya bagi tu kebanyakkannya channel FTA mcm DLTV (punya banyak...sampai 15 chnl)...Siam Sport (dulu scrambled...tapi skg dah bukak).

Author: Sniper2 Time: 15-4-2010 01:40 PM
Dear All
If you receiver have singal issued, such as Vertical OK Horizontal failed, both V/H failed or Signal strength up and down not stable. The IC attached in this message will show it.
IC : LM317
Price : MYR1.50
Note: this topic only for technical reference, if you have any source want to add (support with photo), welcome to share with everybody, but do not asking question here.

Author: Sniper2 Time: 15-4-2010 01:44 PM
Author: Sniper2 Time: 15-4-2010 01:49 PM
Your Location Satellite Data Dish Setup Data
Latitude: 3.1770°
Longitude: 101.6816° Name: 91.5E Measat 3
Distance: 35921km Motor Latitude: 3.2°
Declination Angle: 0.6°
Dish Elevation: °
Elevation: 77.5°
Azimuth (true): 252.8°
Azimuth (magn.): 253.1°
LNB Skew [?]: 72.5° Dish Skew [?]: 90.0°
Your Location Satellite Data Dish Setup Data
Latitude: 3.1770°
Longitude: 101.6816° Name: 105.5E Asiasat 3S
Distance: 35820km Motor Latitude: 3.2°
Declination Angle: 0.6°
Dish Elevation: °
Elevation: 84.1°
Azimuth (true): 129.7°
Azimuth (magn.): 130.0°
LNB Skew [?]: -50.2° Dish Skew [?]: 90.0°
Your Location Satellite Data Dish Setup Data
Latitude: 3.1770°
Longitude: 101.6816° Name: 88.0E ST-1
Distance: 36015km Motor Latitude: 3.2°
Declination Angle: 0.6°
Dish Elevation: °
Elevation: 73.5°
Azimuth (true): 257.1°
Azimuth (magn.): 257.4°
LNB Skew [?]: 76.8° Dish Skew [?]: 90.0°
Your Location Satellite Data Dish Setup Data
Latitude: 3.1770°
Longitude: 101.6816° Name: 108.0E NSS 11 | Telkom 1
Distance: 35849km Motor Latitude: 3.2°
Declination Angle: 0.6°
Dish Elevation: °
Elevation: 81.7°
Azimuth (true): 116.6°
Azimuth (magn.): 116.9°
LNB Skew [?]: -63.2° Dish Skew [?]: 90.0°
Your Location Satellite Data Dish Setup Data
Latitude: 3.1770°
Longitude: 101.6816° Name: 78.5E Thaicom 2, 5
Distance: 36403km Motor Latitude: 3.2°
Declination Angle: 0.6°
Dish Elevation: °
Elevation: 62.6°
Azimuth (true): 262.6°
Azimuth (magn.): 262.9°
LNB Skew [?]: 82.0° Dish Skew [?]: 90.0°
Author: Sniper2 Time: 15-4-2010 01:54 PM


Author: Sniper2 Time: 15-4-2010 02:01 PM
Post Last Edit by Sniper2 at 15-4-2010 14:02
Author: Sniper2 Time: 15-4-2010 02:01 PM
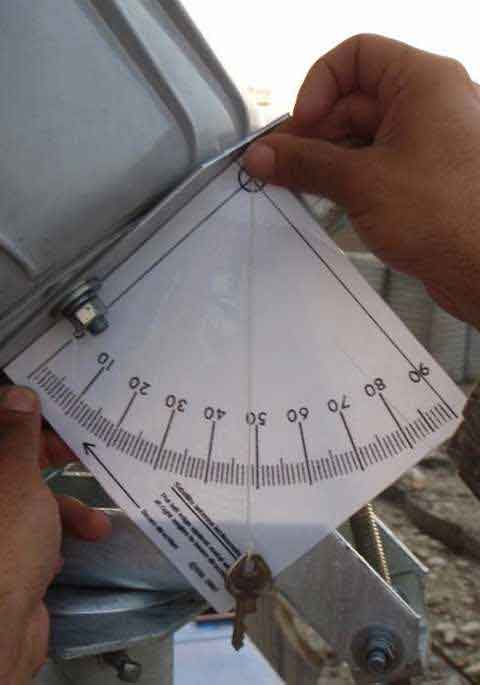
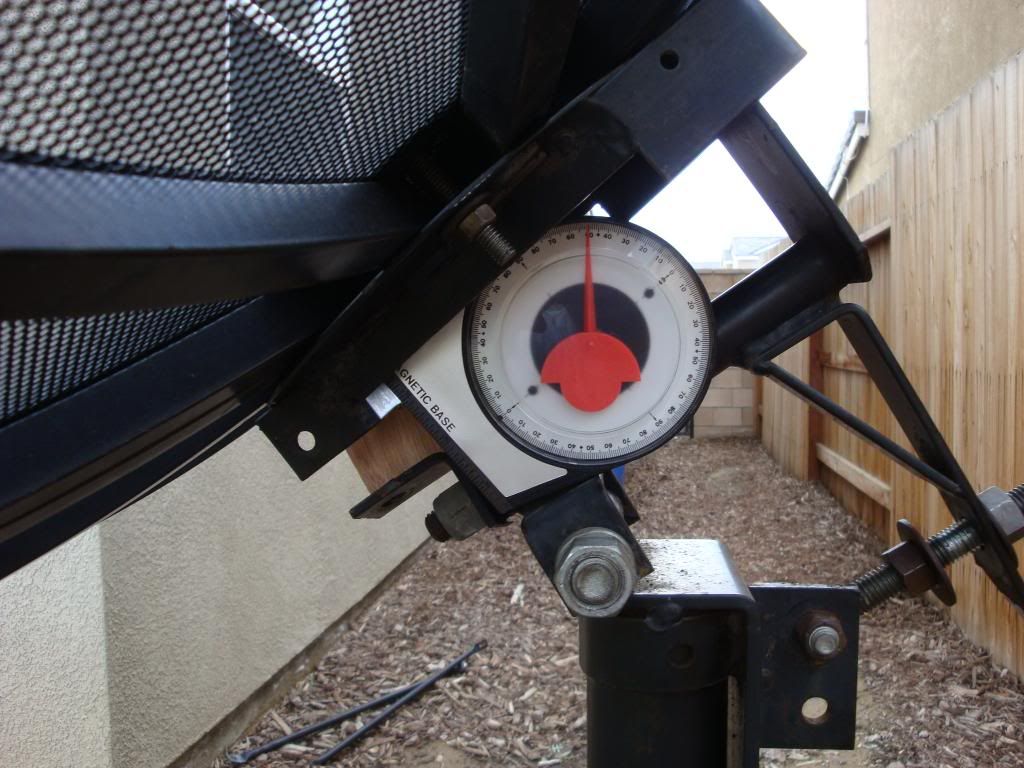
| How to make an inclinometer |
You can easily make you own inclinometer, for satellite dish elevation adjustment, which will more accurate than most cheap ones you can buy.
Instructions on how to make an inclinometer:You need to print out the image below and stick it onto a piece of cardboard. Make a pinhole at the apex (centre of the small circle, near top left corner) and insert a length of strong sewing thread. Behind the card use sticky tape to secure the thread. At the front, attach a small weight, such as a 15mm or 1/2 inch metal nut, to the end of the thread, approx 20 cm or 8 inches long, so the weight dangles down past the lower edge of the card.
How to print the square image: Put your mouse on the image above, and do right mouse click, then select "Print picture". After you have printed, check by measuring each way that the image has printed as an exact square.
Your printer will inset a left white margin. Don't worry, if you put the paper into the printer feeder straight then the picture will still be accurately upright and parallel to the left side of the paper. When attaching to a card make sure the left edge of the paper goes exactly to the left edge of the card so the left margin gap is parallel down the left side.
How to use your inclinometer:
To use it, simply place the left edge of the card against the surface you are trying to measure. See installing a Prodelin VSAT satellite dish for a picture of the inclinometer in use. Always think about the angle and ask yourself if the meaning of the numbers make sense. Lowering the beam should reduce the elevation angle, down to zero at the horizon. Straight up is 90 deg. If the scale reads backwards in your case, don't worry; just count the degrees from the other end.
In the case of axi-symmetric, circular dishes, with 3 or 4 equal length struts supporting the LNB on the exact centre line, then the beam is at right angles to the central backing structure behind the reflector.
In the case of offset fed antennas, where there is a main feed support arm, normally at the bottom of the dish, and two shorter side support struts there is an offset angle. When the front face of the dish is upright the beam will have an elevation angle of perhaps 22.5 deg, 25 deg etc according to the specific manufacturer. To help in these cases, the manufacturer often makes a part of the metal structure so it is at right angles to the beam direction. This metal part may be the lower part of the spine behind the dish or form the rear part on a sloping boss fixture behind the middle of the dish. If there is scale you don't need this inclinometer !
Author: Sniper2 Time: 15-4-2010 02:05 PM


CH-3: 3965 H 4550
CH-5: 3906 H 6240
CH-7: 3765 H 5900
CH-9: 3887 H 15625
NBT: 4105 H 4688
Thai PBS: 4145 H 4815
DMC: 3600 H 26667
SBT Luangtabua: 3803 H 1445
SBB TV: 3544 V 30000
TV MUSLIM: 3544 V 30000
Gang Cartoon: 4158 V 1852
Mix Theater: 3585 V 26667
Mongkol Channel: 3544 V 30000
Major Channel: 3585 V 26667
Variety Channel: 3585 V 26667
Cham Channel: 3912 V 1852
Nation Channel: 3960 V 30000
TV GlobalNetwork: 3600 H 26667
TV Pool Channel: 3544 V 30000
Bangkok Today: 3544 V 30000
MVTV 5: 3585 V 26667
Star Channel: 3585 V 26667
One Channel: 3458 V 2222
Voice TV: 3544 V 30000
Mahadthai : 3987 H 2025
People Channel : 3511 H 13333
ICT Network: 3509 V 3333
News Ch: 3585 V 26667
Green Channel: 3544 V 30000
Bang Channel: 3544 V 30000
You Channel: 3960 V 30000
Fan TV: 3544 V 30000
Sabaidee TV 3960 V 30000
Hit Station: 3585 V 26667
P5 TV: 3585 V 26667
EARTH: 3600 H 26667
PSI Channel 4155 V 2222
ASEAN TV: 3887 H 15625
ACTS Channel: 3544 V 30000
Football Plus: 3600 H 26667
S Channel: 3544 V 30000
My TV: 3585 V 26667
Ace Channel: 3600 H 26667
MB Channel: 3915 V 2222
NEO TV: 3544 V 30000
PEAK TV: 3600 H 26667
Oho Channel: 3960 V 30000
Jewelry Channel: 3544 V 30000
H Plus Channel: 3585 V 26667
Doodee Channel: 3505 V 1852
Dara Channel: 3585 V 26667
Super Cheng: 3544 V 30000
i Channel: 4016 H 2300
in TV: 3545 V 30000
TEN TV: 4016 H 2300
Ai-Net Channel: 3585 V 26667
Author: Sniper2 Time: 15-4-2010 03:10 PM


Author: Sniper2 Time: 15-4-2010 03:20 PM


Azimuth is measured from the South and is positive westwards.
Elevation is measured from the horizontal and is positive upwards.
LNB skew is positive clockwise when facing the dish.
Author: Sniper2 Time: 15-4-2010 03:22 PM
intelsat 7/10 (multichoice) indoor 1.8m cband dish. Rm 202, Valleyview Hotel. Quality 36%


Author: Sniper2 Time: 15-4-2010 03:26 PM

Author: Sniper2 Time: 15-4-2010 03:29 PM
Grounding Satellite Dish and Lead-In Cables
http://www.mikeholt.com/mojonewsarchive/GB-HTML/HTML/GroundingSatelliteDishandLe ad-InCables~20020303.htm
Author: Sniper2 Time: 15-4-2010 03:47 PM


http://www.cfa.harvard.edu/space_geodesy/IMAGES/Elevation.jpeg

Author: Sniper2 Time: 15-4-2010 03:52 PM

มุมส่ายรับ ทิศทางที่จานจะไปตามลูกศร คือด้านตะวันออกียงใต้

LNBปรับศูนย์ไปอีกประมาณ90องศา
โปรแกรมเครื่อง โดยใส่ความถี่เพิ่มไปและเมื่อปรับหน้าจานตรงระดับคุณภาพก็จะขึ้น

Author: Sniper2 Time: 15-4-2010 03:52 PM

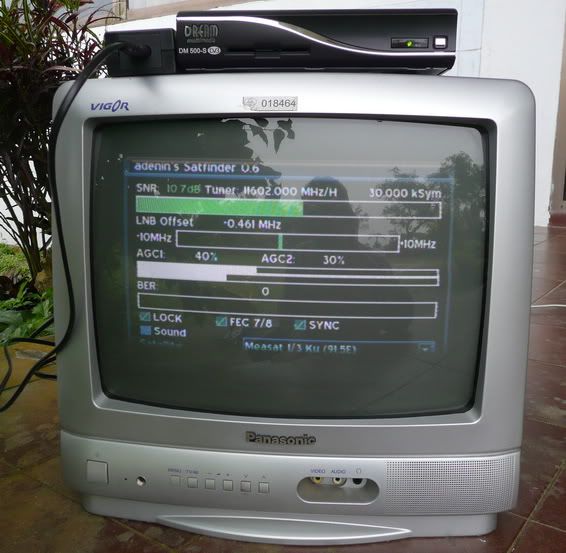
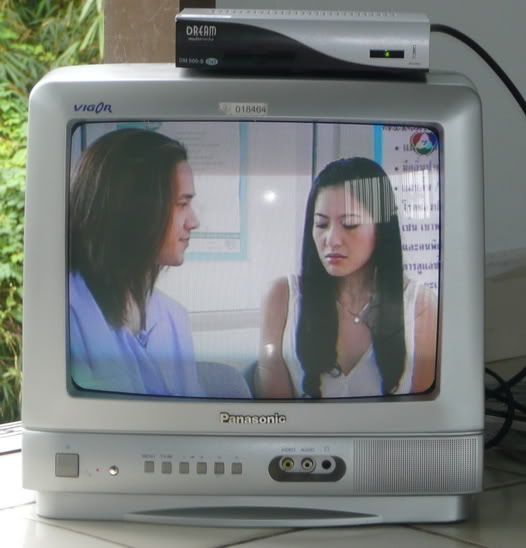
หลังจากแกะออกมาจากกล่อง ก็มีรูปร่างหน้าแบบรูป
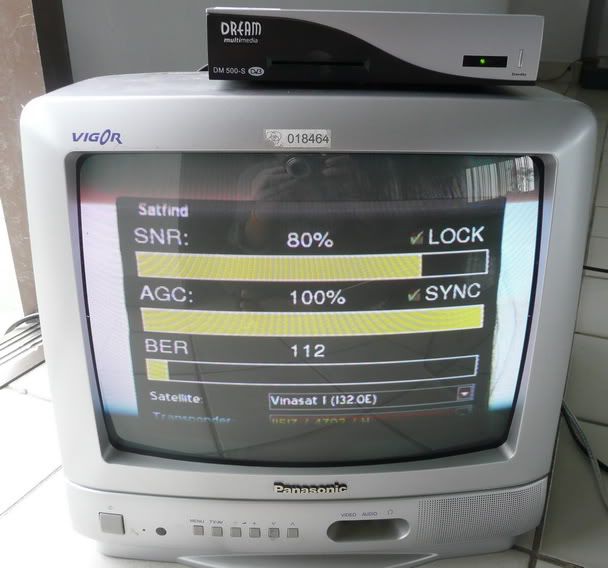
จัดแจงต่อสายเข้าเครื่อง dreambox ลองกันเลย
รับสัญญาณจาก THAICOM KU ได้ดีไม่แพ้จานขนาด 72ซม.ทั่วๆไป
เปรียบเทียบขนาดกันหน่อย เห็นแล้วเล็กจริงๆ
ลองรับสัญญาณ KU จาก ดาวเทียม MESAT3 91.5 ได้ไม่มีปัญหา
มุมเงยเยอะไปหน่อยเลยต้องถอดขาด้านหลังวางแบบในรูป
ลองรับสัญญาณจากดาว NSS6 95 องศา ยิ่งสบายมาก


มุมเงยก็ยังเยอะอยู่ก็ยังต้องตั้งจานตามรูป
สงสัยคงออกแบบมาเพื่อไทยคม โดยเฉพาะ เลยต้องเอาขาด้านหลังไปไว้เกือบสุด
ทีนี้มาถึงดาวเทียมเวียดนาม( VINASAT 132 องศา กันบ้าง
ซึ่งช่อง7สี ก็มาใช้บริการที่นี้เหมือนกัน ไว้สำรองและส่งข่าว แต่เวลาไม่ค่อยแน่นอนว่าจะส่งเมื่อไหร่ต้องเฝ้ากันหน่อย
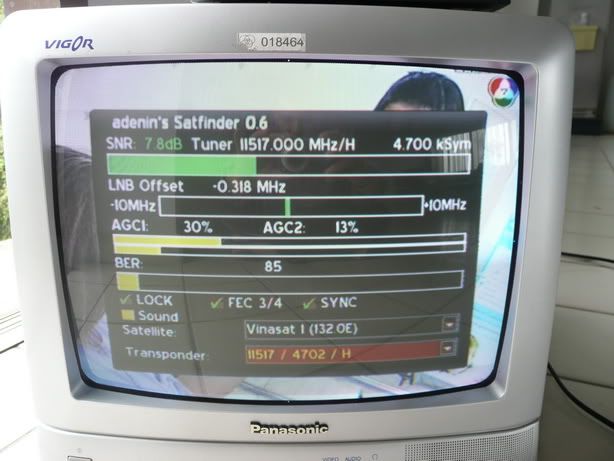
มุมเดียวกันกับจากขนาด 2.4 เมคร แต่เมื่อเทียบกับขนาดกันแล้ว ไม่น่ารับสัญญาณได้นะ

Author: Sniper2 Time: 15-4-2010 04:23 PM
The astro service follows your decoder and dish. You can ask astro installer to move the dish for you (for some fee) or you can do it yourself. If you want to DIY you need to know where to point your dish.
Here's what I did when I moved house last month. Went to http://www.n2yo.com/?s=29648 and took note of Azimuth and Elevation values (azimuth should be around 253 degree west and elevation at 77 degree if you're around KL).

Used my iPhone's compass to point my dish to the azimuth value.

Adjusted the elevation

And got green signal.

Author: Sniper2 Time: 15-4-2010 04:26 PM


Author: Sniper2 Time: 15-4-2010 04:28 PM
Introducing SatHunter
Calculate angles of satellite dishes. SatHunter is a program for calculating the orientation of a satellite antenna.
SatHunter contains all the necessary information for adjusting the satellite antenna to the selected satellite. The adjustment is made with the help of available tools (a compass or a protractor, a plumb, a tape measure) and requires neither expensive equipment nor deep knowledge about satellite television.
SatHunter � An easy-to-use tool that will help you to align a satellite system and easily find the signal from a satellite. The program has many features, such as: Sat azimuth, Sat elevation, Transponder list, DVB Tuner and more.
SatHunter - Find TV satellites in the sky.
FeaturesMain features:
- Calculates the azimuth and elevation angle.
- Provides a list of satellite transponders for setting up the receiver.
- Calculates the solar azimuth angle.
- Calculates the time when the satellite and solar azimuth angles coincide.
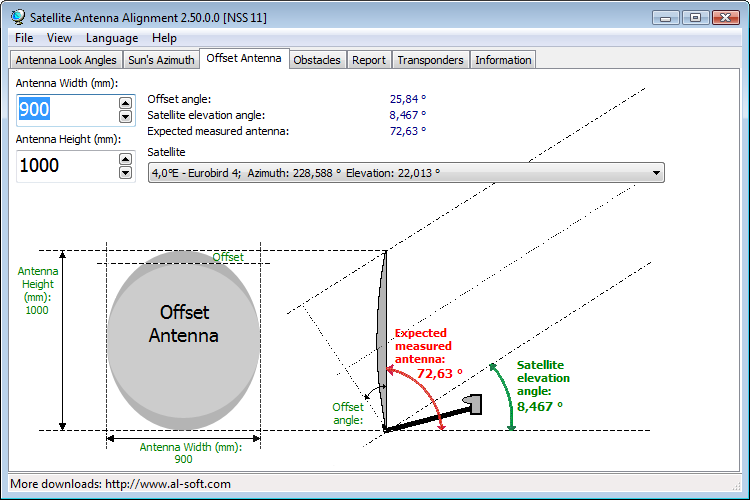
- Calculates the antenna offset angle and tilt.
- Points the antenna using the azimuth with the help of the sun and a protractor.
- Points the antenna using the azimuth with the help of a compass.
- Adjusts the elevation angle with the help of a tape measure and a plumb.
- Detects coordinates by IP or by using a list of cities.
- Detects time using an exact time server.
- Scans transponders with a SkyStar DVB card.
- View signal level and quality with sound signalization.
- Free for private home use.
How-To Guide How to point the antenna to the satellite with SatHunter
Follow these step-by-step instructions:
1. Preparatory Operations
Assemble the satellite antenna according to the manual. Select the place for the antenna. Mount it facing south (for the Northern hemisphere).
There must not be any obstacles (buildings, trees, etc.) between the antenna and the selected satellite.
The bracket the antenna is mounted on must be strictly vertical (use a level):

Mount the antenna on the bracket, but do not tighten the adjusting bolts too much, because the antenna must move in two planes.

To point the antenna to the satellite, you should position it according to the azimuth and the elevation angle.
2. Software Configuration
Before you start working with SatHunter, you should configure it:

Time and date are automatically adjusted when you start the program.
At any moment, you can set the software time to the local computer time (using the Get local time button) or get it from an exact time server (using the Get SNTP Time button).
Enter your local geographic coordinates.
If you do not know your coordinates, select the nearest city from the city list or click the "Autodetect" button, and SatHunter will try to detect your location automatically.
From the list provided, select the satellite to which you want to point the antenna:

Elevation
3. Adjusting the Antenna Elevation Angle
3.1 If Your Antenna Has a Scale
Find the elevation angle of your satellite in the table:
� 
Adjust the angle on the antenna:

3.2 Using a Plumb

Specify the width (W) and height (H) of the antenna.
Use the plumb and a ruler to specify the X length.
Fasten the antenna vertically.
Azimuth
4 Pointing the Antenna by the Azimuth
4.1 With the Help of a Compass

Remove the antenna from the bracket. Mount the compass on the bracket and position it southwards by rotating it (180). Mark the necessary azimuth (122 in this example) on the bracket with an indelible marker.

Mount the antenna on the bracket and orient it towards the necessary azimuth.
Note that you have to take into account your local magnetic declination in this case.
4.2 With the Help of the Sun
Use the table below to see the time when the satellite azimuth and the solar azimuth coincide:

Orient the antenna towards the sun at that exact time (you can use a matchstick shadow):

Match the shadow and the line along the LNB bracket.
Author: Sniper2 Time: 15-4-2010 04:29 PM
4.3 With the Help of the Sun and a Protractor
Find the difference between the solar azimuth and the satellite azimuth for the desired time.
The shadow from the sun will point to this angle in case of exact orientation towards the satellite.

Print the protractor. (You can use the compass dial as a protractor.)

Attach the protractor to the LNB bracket (180 forward), push a match or a toothpick through its center:

Match the shadow with the previously detected corner by revolving the antenna on its axis.
You can see the table of solar azimuths for the current day. You can print the table and use its data during the mounting process.
5 LNB Rotation
Rotate the LNB in its housing to the correct angle and direction:


6 Tuning
6.1 Setting the Tuner
Connect the antenna LNB to the receiver and the receiver to the TV set according to the receiver manual.
Enter the transponder properties into the receiver (frequency, symbol rate, polarization, forward error correction):

You can find the list of transponders for the selected satellite and their properties in the Tuner section of SatHunter:

To get more detailed information about transponders, click the �View�� by the corresponding satellite.

6.2 Tuning with a S��Star DVB card:
If there is a DVB-S card installed on your computer, you can set up antenna precisely using the Tuner section.
Use the list to select the necessary transponder or enter its properties manually, then click the "Set Tuner" button.

7. Fine-Tuning
If you have done everything correctly and accurately to this point, you should see a quality bar on the connected receiver or in SatHunter:


If this is not the case, try moving the antenna slowly vertically or horizontally in search of the satellite beam.

Make sure you try to get the maximum quality level.
Set up the receiver according to its manual.
Working with SatHunter SatHunter contains all the necessary information for adjusting the satellite antenna to the selected satellite. The adjustment is made with the help of available tools (a compass or a protractor, a plumb, a tape measure) and requires neither expensive equipment nor deep knowledge about satellite television.
To start working with SatHunter:
1. Enter your coordinates.
2. Select the satellite you want to point the antenna to in the list.
You will see all the necessary calculations in the lower pane of the program window.

Quick start
1. Enter your geographic coordinates, date, and time.

2. Select the satellite you need.

3. Enter the size of your antenna.

4. Find the calculation results in SatHunter�s lower pane.
Sat azimuth: Orientation towards the satellite.
X: The offset of the antenna edge from the plumb.
R: LNB rotation in its housing.


Author: Sniper2 Time: 15-4-2010 04:29 PM
The Site Tab
Time and date are automatically adjusted when you start SatHunter.
At any moment you can get the local computer time (using the Get local time button) or get it from an exact time server (using the Get SNTP Time button).
Enter your local geographic coordinates.
If you do not know your coordinates, select the nearest city from the city list or click the "Autodetect" button, and SatHunter will try to detect your location automatically.
The Satellites Tab
From the list provided, select the satellite to which you want to point the antenna:

You will see the necessary data for the antenna setup in the lower pane:
Sat azimuth � Orientation towards the satellite
Sun azimuth � Orientation towards the sun
Sat-Sun � The difference between the solar and satellite azimuth for orientation with the help of a protractor
L � Angle relative to the plumb
X � Offset (in millimeters) from the plumb
R � LNB rotation

The Sun Tab
Find the difference between the solar azimuth and the satellite azimuth for the desired time.
The shadow from the sun will point to this angle in case of exact orientation towards the satellite.

Print the protractor and attach it to the antenna (180 forward).
Match the shadow with the selected angle by rotating the antenna.
The Multifeed Tab It is possible to receive a signal from several satellites with one antenna.
To do so, position the LNBs according to the calculated scheme.
Focus � Focal length (in millimeters). This is the length between the LNB and the point on the satellite dish to which it is directed.
Center � Central satellite.
Feed � Side satellite.
Converter � LNB diameter (in millimeters).

Enter the parameters, then click "Calculate", and SatHunter will calculate the LNB position.
Mount the second LNB and connect it to the receiver via the DiSEqC
switch.
The Tuner Tab
If there is a SkyStar tuner installed on your computer, you can use this section to fine-tune the antenna.

Author: Sniper2 Time: 15-4-2010 04:37 PM


เป็นแนวเอียงของขั่วรับสัญญาณ (มองเข้าหาหน้าจาน)LNB หรือ LNBF ซึ่งมีผลต่อการรับสัณญาณ ถ้าหันไม่ถูกต้อง อาจจะรับสัญญารไม่ได้เลย
Author: Sniper2 Time: 15-4-2010 04:42 PM

Author: Sniper2 Time: 15-4-2010 04:47 PM


Author: Sniper2 Time: 15-4-2010 04:48 PM
ถ้าจะเอาให้แม่นยำ ต้องเข้าเวปนี้ จะคำนวนพิกัดให้อย่างแม่นยำ
http://www.dishpointer.com/
มุมกวาด (Azimuth) มีสองแบบคือแบบองศาแท้ (True) กับแบบองศาตามเข็มทิศ (Magnetic) โดยนับจากทิศเหนือให้เป็น 0 องศาและทิศใต้คือ 180 องศา

มุมเงย (Elevation) วัดจากแนวราบแหงนขึ้นไปยังดาวเทียม

แต่ถ้าใช้เครื่องรับคำนวน ส่วนใหญ่มักจะได้เป็นมุมก้ม วัดจากแนวตั้งฉากลงมา

มุมเอียง (LNB Skew) ปรับเพื่อให้เอียงตรงกับแนวสัญญาณที่ส่งมา โดยให้เส้นตรงหน้าคือแนว 0 องศา ถ้ามีค่าบวกให้หมุนเอียงไปทางซ้าย ถ้ามีค่าลบให้หมุนเอียงไปทางขวา

Author: Sniper2 Time: 15-4-2010 04:50 PM


Author: Sniper2 Time: 15-4-2010 04:55 PM
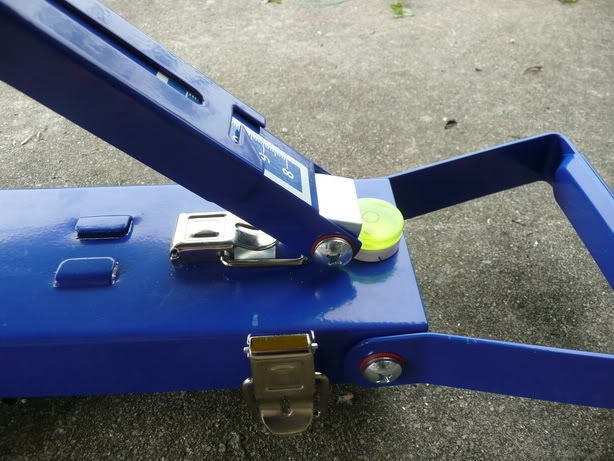
: : วัดมุมชดเชย : : [size=-7]วัดค่ามุมชดเชยทั้งด้านหน้า และหลังให้เท่ากัน ถ้าไม่เท่ากันให้ปรับ น็อตมุมชดเชย (ถ้าเป็นจานของ PSI จะมีการปรับส่วนนี้ให้ เรียบร้อยจากโรงงานแล้ว จึงไม่จำเป็นต้องปรับอีกต่อไป)
แล้วนำ angle มาติดที่คอจาน (ดังรูป) แล้วปรับน็อตที่มุมก้มเงยของจาน (อยู่ติดกับเม้าท์ ที่มีรูสไลด์) ให้ได้มุมเงยแต่ละจังหวัด ดูได้จากตาราง ของดาวเทียม)[size=-7]


: : ปรับหน้าจาน : : ตั้งแกนรองรับให้หน้าจานหมุนไปทางทิศใต้ (โดยใช้เข็มทิศหาทิศ ซึ่งควรขีด เส้นไว้บนพื้นเป็นรูปกากบาท แล้วให้แนวก้านจานเบอร์ 6-12 ขนานไปกับแนวเหนือได้) จากนั้นให้ทำการ ล็อคน็อตประกับรัดคอแน่นพอประมาณ เพราะว่าจะต้องหมุนปรับละเอียดอีกครั้ง เพื่อหาภาพที่ชัดเจนที่สุด
Author: Sniper2 Time: 15-4-2010 04:56 PM
จุดผิดบ่อยๆของช่างมือใหม่ จุดที่ผิดพลาดบ่อยๆของช่างมือใหม่

การประกอบชุดแขนจับ LNB ที่ถูกต้อง
ช่างมือใหม่มักทำผิด
|

แขนจับ ต้องตรงรุ่น ด้วยบางครั้งจัดผิดรุ่นไปก็มีครับ...
จานขนาด 5' ก็ต้องใช้แขนจับ LNB 5' ด้วยสังเกตุด้วยนะครับ
|

ภาพตัวอย่าง การประกอบแขนจับ LNB กับ สกาล่าริง
|

น็อตต้องใส่แหวนก่อนและร้อยผ่านหมวก
|

หมวกจะคว่ำหรือหงายก็ได้ตามสะดวก
แต่ถ้าต้องการทำ DUO ควรหงายฝาหมวกชั้นใน
|

ตามรูปตัวอย่างแบบนี้ ผิด จะทำให้ระยะโฟกัสของจานผิดไป
|

ตามรูปตัวอย่างแบบนี้ ผิด จะทำให้ระยะโฟกัสของจานผิดไป
|

แบบนี้ถูกต้องครับ
|

แบบนี้ถูกต้องครับ
|

ลำดับการประกอบ น็อตใส่แหวน...ร้อยผ่านหมวกฝาใน
....ร้อยผ่านแขนจับ LNB....แล้วขันเกลี่ยวเข้ากับสกาล่าริง
|

เมื่อประกอบครบจะเป็นดังภาพตัวอย่าง
|
Author: Sniper2 Time: 15-4-2010 05:46 PM
Support
Dish Installation |
 | This section describes how to install a 30" fixed dish. |
To receive satellite broadcast signals, your satellite dish needs to be positioned correctly. You can do this yourself. Determining the Elevation and Azimuth
The satellites are "parked" approximately 22,300 miles above the equator. In reality, the satellites travel from west to east, but to us on Earth they appear stationary because they match the exact speed of the Earth’s rotation. (This is a geostationary orbit.) If you stand up now, turn towards the southern hemisphere, and tilt your head up to the heavens, you’ll be looking in the general direction of our satellite To calculate the azimuth and elevation angle for your location, you may click on this Azimuth/Elevation link. We implemented this software on our website and the link will now always work. You ou can download this small look.exe file from this website which can run on your PC. |
| | |
Azimuth | Elevation | Elevation Reading |
Now that you have your azimuth and elevation coordinates, what do you do with them?  First, survey the site to ensure an unobstructed view in the direction of the satellite. To receive broadcast signals, your satellite dish needs to be positioned correctly. Mount your satellite dish so that the base fits flush with the mounting surface (level if mounted on a flat beam or roof, or on an angle to match the pitch of your roofline). When you have securely mounted your satellite dish, adjust your dish so that the dish mast is plumb, that is, exactly perpendicular to level - this is best achieved using a carpenter's level. With your dish now mounted and properly set, you are now ready to aim your dish toward the satellites. First, survey the site to ensure an unobstructed view in the direction of the satellite. To receive broadcast signals, your satellite dish needs to be positioned correctly. Mount your satellite dish so that the base fits flush with the mounting surface (level if mounted on a flat beam or roof, or on an angle to match the pitch of your roofline). When you have securely mounted your satellite dish, adjust your dish so that the dish mast is plumb, that is, exactly perpendicular to level - this is best achieved using a carpenter's level. With your dish now mounted and properly set, you are now ready to aim your dish toward the satellites.
To set the dish to point up to the satellites, you’ll first need to set the elevation. Then you’ll point the dish in the proper left-to-right position, to set the azimuth. You’ll need to refer to the installation manual for your system for detailed instructions, but here’s the short course.
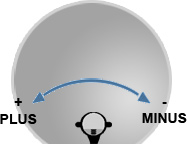
Setting the Elevation (UP), (DOWN)
You can set the proper elevation after the dish is securely mounted. First, loosen the nuts securing the two elevation bolts so that the dish easily moves up and down. Line up the elevation indicator with the tick mark corresponding to your elevation number. Then tighten the bolts. You may need to readjust the elevation up or down slightly to get the best signal. See figure on top. Setting the Azimuth (LEFT), (RIGHT)
Loosen the azimuth nuts on the LNB arm enough that the dish can be turned smoothly with little pressure. Set the azimuth by moving the dish left and right. Point the dish in the general direction of the satellite, in the southern hemisphere. By using a compass you can better pinpoint the direction with your azimuth number to correspond with the degrees on your compass. See figure on top.
Acquiring the Signal
Now your dish will be in position to lock in on the satellite signal. You’ll need to 1) have your digital receiver connected to your television, with both turned on, and 2) have your antenna LNB to receiver cables connected, and 3) be viewing your Setup Antenna/Signal Strength display from your digital receiver's on-screen menu to measure the signal strength accurately. To view the signal strength and quality (Satcruiser receivers Telstar 5 for example) press Menu, Installation, TP Configuration, select Telstar 5 and frequency 12152 or frequency 11898.
Ask a helper to watch the Signal Strength screen for indications you are receiving the signal, the upper meter is the signal strength, the lower meter is the signal quality. Please note that you will receive the signal ONLY when there is a signal on the lower meter (signal quality). Stand behind the dish, and holding its outer edges, slowly turn it a little to the right to adjust the azimuth. Pause a few seconds, giving the receiver enough time to lock in on the satellite signal. Continue turning the dish in this way until you have acquired the signal or until you have rotated the dish approximately 15 degrees from the starting point. If you haven’t detected a signal yet, return to the starting point and move the dish to the left again. If you don’t acquire the signal after rotating the dish approximately 15 degrees to either side of the calculated azimuth angle, loosen the elevation bolts and tilt the dish upward so the elevation indicator moves halfway from the current tick mark to the next mark. Then tighten the elevation bolts. If necessary, continue changing the elevation in half-tick-mark increments until you receive the signal. After tilting the dish upwards three tick marks beyond the original tick mark, return it to the original tick mark and then tilt it down a half tick mark. Keep repeating this until you receive the signal. If the Signal still eludes you, check: Check to make sure that the mount is 100% level. The portion that the dish mounts on must be straight up to the sky level. Otherwise you will not be able to find the signal That nothing--a tree, for example--obstructs the signal that the cables are connected properly to the receiver. That you have the correct azimuth and elevation coordinates Fine Tuning
Now that you have received the satellite signal, it is important to fine tune the dish pointing to make sure you have the maximum possible signal strength. Maximizing the signal is important, in that, it reduces "rain fade" during inclement weather. Loosen the elevation bolts, then gently continue turning the dish a little in the same direction you were turning it when you began to receive the satellite signal. Pause for a few seconds each time after moving the dish. Turn the dish in this way until the signal quality strength reaches its highest reading and then begins to fall. Then slowly turn the dish the opposite way until you again receive the highest reading on the Signal Strength screen. Important: The Signal Strength reading does not need to be "100." Lock in on the highest possible signal. Tighten the azimuth bolts. Loosen the elevation bolts. Slowly tilt the dish up and down to improve the Signal Strength reading. When you are satisfied that you have the strongest signal, tighten the elevation bolts. |
Author: abede Time: 17-6-2010 10:21 PM
aku minat nak pasang 3-4 LNB dlm satu dish...tapi tak reti nak setup la....
Sekarang aku pakai 1 LNB sahaja...macamana nak buat arr...?
Author: irafeeq Time: 8-5-2012 04:46 PM
Post Last Edit by irafeeq at 10-5-2012 03:43
Dish Installation Guides/Panduan Pemasangan Dish
================================================================
DM500S dengan 7 bulan C-lines RM370.00
Openbox/Skybox S10HD PVR dengan 7 bulan C-lines RM420.00
DM800HD PVR dengan 7 bulan C-lines RM680.00
ASTRO/Telkomvision/Indovision C-lines tiket RM250.00 setahun
*Tayangan Truevision (Thailand) & Telkomvision (Indonesia) lebih kurang sama (cth: HBO Hits, Family & Signature dll) jadi bagi pengguna Malaysia tidak perlu subskripsi Truevision melainkan anda fasih berbahasa Thai. Walaubagaimanapun subskripsi dari negara lain yang mempunyai tayangan berbeza akan ditambah kemudian.
Author: AdamBillionaire Time: 28-11-2012 11:23 AM
kat malaysia tak boleh pakai lah bro antarnye masalah kastam dengan kementerian apa entah aq lupa. salah satu faktor tak bayar cukai siaran. kerajajan tak dapat hasil cukai sebab tu dia tak bg tgk kalau tgk astro kerajajan dpt lah hasil cukai beli je satelit boleh masuk poket seluar. kalau beli yg besar2 jenis nak tembak tahi bintang tu sure kastam boleh nampak dari jauh
| Welcome to CariDotMy (https://mforum.cari.com.my/) |
Powered by Discuz! X3.4 |


