|
View: 7544|Reply: 3
|
diagram relay lampu besar
[Copy link]
|
|
|
|
siapa boleh bantu saya .tolong cbuat diagram relay lampu besar. |
|
|
|
|
|
|
|
|
|
|
|
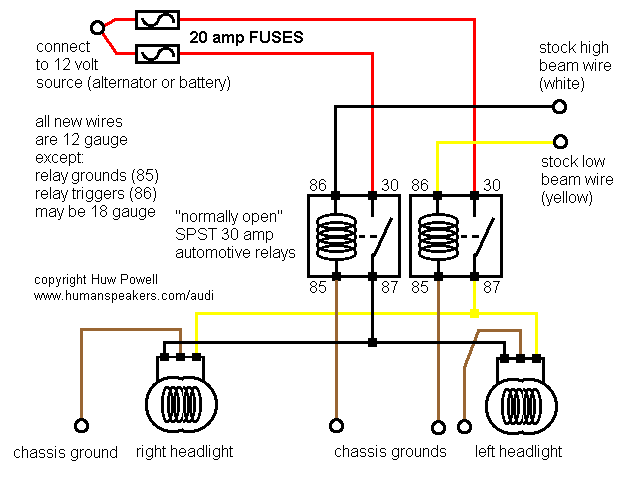
Relaying Headlights

You can build this from raw materials using:
2 - 30 amp automotive style NO SPST relays
2 - fuse holders and 20 amp fuses
12 feet or so of 12 gauge wire
3 or 4 feet of 18 gauge wire (it is best to use several colors of wire)
8 crimp on 1/4" female terminals or sockets for the relays
3 or 4 crimp on ring terminals
a few crimp on butt splices (or solder and heat shrink supplies)
a few zip ties for mounting parts and securing wires neatly
a new pair of headlight sockets, with short leads, to fit your bulb type
optional but a good idea - split loom to protect your new wiring
Or get a pair of Hella auxiliary light harnesses and remove the excess:
The switch wiring is unnecessary
(I will dig out the diagram and list exactly what needs to be removed later)
Procedure hints:
Disconnect the car's battery ground terminal prior to doing any work!
Work neatly, make sure all your wires are a bit longer than you think you will need. You can always leave off the last connector and trim them down later if they are too long. You should still leave 6-12" of excess for workability and unforeseen problems (or mistakes).
Use the white and yellow wires that went to the stock left side headlight bulb to supply the "trigger" signal for your relays.
Place the fuse holders immediately after the connection to 12 volts to protect all your wiring.
The alternator output post is a great place to get your 12 volt supply. If this is not practical, you can get it from the battery positive post or an underhood jump terminal.
Keep these connection very neat and simple so you do not risk nasty, spark throwing short circuits.
I like to use nearby screws or bolts for my ground connections (the bumper mounting bolts work very well). This makes the wires simple to connect, and nice and short. You can also run them back to the battery negative terminal, but be sure to allow a separate 12 gauge wire for each side headlight.
All wiring should be placed neatly where it will not be scraped, abraded, or exposed to high temperatures - pay careful attention to rotating parts, belts, and suspension or steering parts that change position when the car is in use. It should be zip tied in place to keep it that way. If you are using split loom to cover the wiring, still be careful of these considerations.
Using 20 amp fuses and 12 gauge wire permits up to 200 watts of light on each circuit if you want to use uprated bulbs.
I have not shown dual high beam wiring in the schematic above, for simplicity's sake. To use a double bulb system you connect the second high beam bulb on each side to the same wires as the first one, in parallel.
This mini schematic shows how that is done.
http://www.humanspeakers.com/audi/headlight-simple.htm |
|
|
|
|
|
|
|
|
|
|
|
beli wayar yg elok tau........ jgn sampai keta korang terbakar......  |
|
|
|
|
|
|
|
|
|
|
|
kalau kereta terbako jgn salahkan myk RON95 plak..  |
|
|
|
|
|
|
|
|
|
| |
|